Welcome to the HerediVar Wiki
General Thoughts & Conventions
There are four types of users in HerediVar:
- Superuser
- Standard user
- Read only user
- Anonymous user
- Account manager
The account manager is a special role which allows the user to create and modify user data.
Conventions for links: It is very easy to differentiate external links from internal ones: Whenever a link is displayed like
It is very important to understand that each user is able to insert one classification for each variant - classification scheme combination. In addition, a superuser can insert one consensus classification for each variant. Consensus classifications are always superseded by the newest consensus classification. But all previous consensus classifications are kept and can still be viewed.
The workflow
Insert variants
There are two ways to insert small variants. The most common one is to import variants from HerediCare. However, only superusers can do that. Standard users can
insert variants through the create variant page for small variants. New variants are automatically added to the annotation queue
and processed once a worker is ready to process it. The status of the annotation can be seen when navigating to the variant details page.
HerediVar also supports structural variants, however, in a limited manner. Thus, it is currently only possible to insert deletions, duplications and inversions.
These must be inserted manually through the create structural variant page. Although they generally behave identical compared
to a small variant, they are currently not annotated with meta information.
Browse variants
To find the variant you are looking for navigate to the search variants page. This page shows a paginated table of all variants. The columns of this table are interpreted like this:
- CHR: chromosome
- POS: GRCH38, left-aligned genomic position
- REF: reference base(s)
- ALT: alternative base(s)
- VARTYPE: the type of the variant. This value is "sv:sv_type" if the variant is a structural variant or "small" if the variant is a regular small variant
- HGVS c.: the HGVS c. string for this variant. The reference transcript is the "best" transcript* for the gene of this variant.
- HGVS p.: the HGVS p. HGVS string for this variant. The reference transcript is the "best" transcript* for the gene of this variant.
- GENE: the gene which has the variant. Sometimes there are multiple genes, because the variant has consequences in all of them.
- Your classification: the most recent classification of the user which is currently logged in.
- Consensus classificaiton: the most recent consensus class from the VUS-task-force.
To filter the table of all variants click the magnifiying glass to the top right. You can filter the table of variants by:
-
A variant:
The variant strings are of this format: chrom-pos-ref-alt in case of small variants and chrom-start-end-sv_type in case of structural variants - The variant type: either small variants or structural variants. Checking both is the same as leaving both empty
- A gene name or unique alias or HGVS-ID (e. g. BARD1)
-
A genomic range is described by providing chromosome start position and end position. These values must be separated with ":", "-" or whitespace (except new lines). Both, adding as well as removing the "chr" prefix
from the chromosome is allowed and should yield the same result. Example formats that work:
- chr1:start-end
- chr1-start-end
- chr1 start end
- chr1[tab]start[tab]end
- 1:start:end
- chr1- start-end (note the space between the first dash and the start position)
- chr1::start-end
WARNING: Due to the fact that .bed files can contain any character each bed style range must reside in its own line (ie. they must be separated with newline characters)! - cDNA ranges
This option allows you to filter the variants by ranges of cDNA positions. There are three required values for each query.
- The transcript or a gene symbol. When specifiying a gene symbol the algorithm will choose the best transcript for this gene.
- The cDNA start position relative to 1
- The cDNA end position relative to 1
You can also scan intronic regions by adding or subtracting to the start or end cDNA position. (eg. ENST00000380152 1 68+10). Keep in mind that cDNA positions are counted from the larger genomic position to the smaller one if the gene is defined on the reverse or minus strand. Still, the smaller cDNA position must be inserted as start and the bigger cDNA position as end.
If you want to scan regions outside the gene region add an asterisk (*) or a minus (-) character before the start or end position (eg. ENST00000380152 -100 1). - A HGVS c. string
This search option is most useful when you know the reference transcript. In this case please specify the search string like this: Transcript:c.PositionReference>Alternative (e. g. ENST00000260947:c.1972C>T).
If you do not know the transcript you can also specify the gene symbol (or alias or HGNC-ID) instead of the transcript (e. g. BARD1:c.1972C>T)
In case you neither know the transcript nor the gene it is also possible to omit the reference sequence. But be careful with this type of search as it will provide you with ALL possible nucleotide changes that COULD be the one you are looking for. Thus, you should inspect the results carefully before continueing. (e. g. c.1972C>T)
WARNING: HerediVar will choose the ensembl mane select transcript as reference, if you specify the gene instead of the transcript. If there is no mane select transcript it will omit this HGNC. - IDs
You can search for HerediVar variant_ids or dbSNP rsids, clinvar variation ids, COSMIC ids (COSV) or heredicare vids.
You can insert the ids directly or choose to append a ":" followed by the database name. For example: You can search for rs1057519871, 1057519871:rsid or 1057519871. All of which return the same variant.
It is recommended to specify the database of the identifier to make results more accurate.
Extensions used by heredivar:
- HerediVar variant_ids: heredivar
- dbSNP rsids: rsid
- ClinVar variation ids: clinvar
- COSMIC COSV ids: cosmic
- HerediCaRe VIDs: heredicare
- Annotations
First select the annotation from the dropdown menu, then type the operator. For numerical values you may choose from <, <=, >, >=, = and !=. For text-like values you may choose from =, != and ~. Hereby, ~ is a case insensitive substring match. Finally, provide the value in the next textbox.
It is always possible to add more annotation searches. But be aware that resulting variants must always satisfy all of the criteria at the same time to appear in the variant list. -
A consensus classification. This filters only for consensus classifications which were made within HerediVar and excludes consensus classification which were imported from HerediCaRe.
However, if the "include_heredicare" checkbox is ticked, the search will also display imported consensus classifications (see section on consensus classifications in documentation for further
details on how to spot imported consensensus classifications).
Be mindful though: HerediVar native consensus classifications always overshadow imported ones. So a variant which has an imported consensus classification of 1, but a HerediVar native consensus classification of 2 will not be found if class 1 and include_heredicare are checked (provided class 2 is not checked). - Your classification
- A list of variants
You can separate multiple genes, HGVS or chromosomal ranges in their respective fields either with semicolons (';'), commas (',') or newlines. It is also possible to have a combination of them.
It is also possible to add all variants which satisfy the current filtering criteria to a user defined list by clicking the "Add to list" button located at the bottom left. To create a new list go here. More information about user variant lists is here.
Clicking on any of the rows will get you to its variant details page. To view details about a particular gene just click its name.
The variant details page
This page displays all annotations of a variant. The top headline shows the variant and its most recent consensus classification by the VUS task-force. There are multiple types of consensus classifications:
- -: no classification
- 1: benign
- 2: likely benign
- 3-: uncertain with tendency to benign
- 3: uncertain
- 3+: uncertain with tendency to pathogenic
- 4: likely pathogenic
- 4M: modifier
- 5: pathogenic
Right below the headline one can find status information about the variant. The first pill shows the status of the annotation. It could be queued, processing, done or erroneous. Next to the annotation status pill there is the clinvar submission status. This shows if the variant was already uploaded to ClinVar from HerediVar. There is one additional, optional status pill which sais "HIDDEN" if the variant is hidden. When you click the "gear" button the website presents options on what to do with the variant.
The main body of the page displays visualizations, classifications and annotations which are organized in multiple tabs. The tabs contain the following information:
- Classification: HerediVar consensus classification, HerediVar user classifications, HerediCare center classifications, ClinVar classifications, BRCA exchange and ARUP BRCA classifications
- Population & in-silico annotations: phylop-100way, cadd scaled, revel, spliceai, maxentscan, gnomAD, flossies, cancerhotspots, tp53db, hexplorer, maxhbond score
- Consequence: The variant consequences with associated HGVS strings and protein domains
- Assays: Functional, splicing, etc. assays. Add a new assay by clicking the gear button at the top.
- Literature: Papers annotated by VEP, TP53db and litvar2
- IGV: The IGV genome browser. The first track shows the variant itself. The second and third track show all classified variants (click on them to find a link to the variant details page). The fourth track shows the ensembl transcripts. Red transcripts are MANE select or MANE plus clinical transcripts, orange ones are ensembl canonical and dark blue ones are gencode basic transcripts. Other transcripts which do not satisfy the aforementioned criteria are not shown.
Classify a variant
To classify a variant click the gear button and select "Classify". On the classify variant page you can first select if you want to insert a user classification or a consensus classification.
However, only superusers can insert consensus classifications. Next, select the classification scheme or no scheme if you just want to insert a freetext classification not following a scheme.
The webpage automatically chooses the best scheme for the variant if possible.
Click a criteria button to see more details about it. Here is an example for PVS1:
- unchecked: we do not have enough evidence to say anything about this criterion -> not assessed / unknown evidence
- selected: evidence suggests this criterion is true -> assessed / true evidence
- unselected: evidence suggests this criterion should not be selected -> we KNOW that this criterion is not selected because of evidence -> use this for documentation purposes
Once all criteria have been assessed you can insert further evidence by adding literature. Simply add a blank row or add one from the text mining results and copy the section of interest.
Finally, select the final classification and optionally leave a comment. This is especially encouraged when the selected final classification differs from the proposed classification from the classification scheme.
Note that each user can only have one user classification per variant and scheme, but they can be edited anytime.
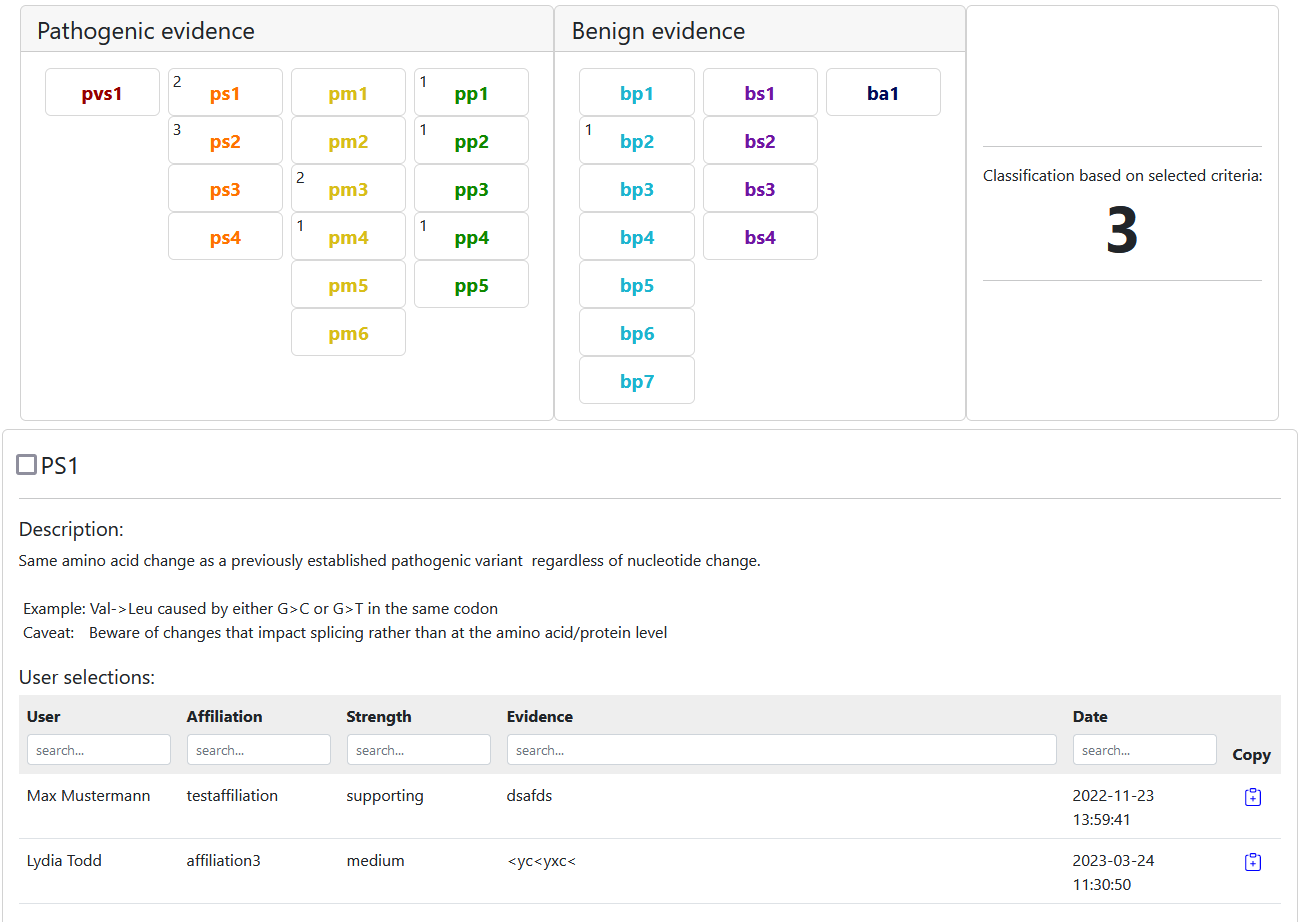
Consensus classifications work just alike. The only difference is that the number of users who chose that criterion is displayed next to it like so:
Automatic classification algorithm: HerediClassify
The automatic classification algorithm called HerediClassify takes the evidence collected by HerediVar and automatically assesses ACMG criteria. By default it uses the ACMG SVI adaptation classification scheme, but it also supports gene specific ACMG classification schemes. These include:
- ATM
- BRCA1
- BRCA2
- CDH1
- PALB2
- PTEN
- TP53
HerediClassify is run by the annotation service of HerediVar. So a reannotation also updates the automatic classification.
The variant classify page allows to copy all selected and unselected criteria from HerediClassify along with their strength and evidence to help speed up the classification process. Using the gear button the user can choose if the criteria using the splicing or protein evidence should be copied.
Every criterion selected in this way will be in the intermediate state. The intermediate state is indicated with dark stripes across the criterion button and is meant as a visual indication for the user that the criterion might need further attention. All intermediate criteria will be treated as if they are not intermediate. This means that they are submitted like they are not intermediate.
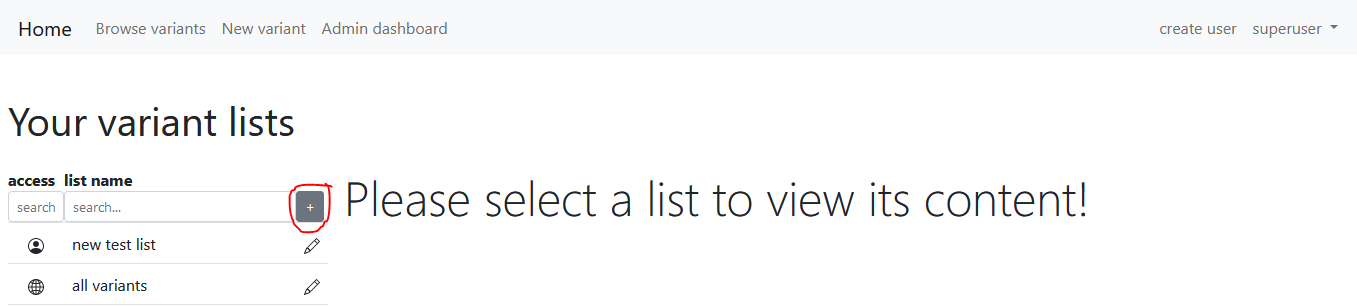
User variant lists
Each registered user can add new variant lists here. Click the "+" button:
There are two ways to insert variants to the newly created variant list. The first one is to add variants to a list on a one-by-one basis is to navigate to the variant details page, click the gear button and select "Add to list".
The second one is to visit the browse variants page. You can simply select the variants that you wish to save to a list and select "Add selected to list". To simplify things one can also choose to select and unselect all variants. Keep in mind that only variants which satisfy the current search parameters are added when select all variants is active. The page also keeps track of selected variants through pages of the variant table. So it is save to first select all variants and then click the "Add selected to list" button once. Keep in mind though that your selection will reset upon querying a new search.
All variants collected in these ways are displayed when clicked on the name of the list at the user lists page. The table of variants behaves exactly the same as the one shown on the browse variants page. It can be filtered and when a row is clicked it takes you to the variant details page.
It is also possible to export all variants in one of the lists to vcf by clicking the "Export to VCF" button on the bottom of the page.
If you want to change the properties or delete a list that was created by you. Just click the little pencil button next to the list name. Beware that private lists can not be seen by other HerediVar users.
To further simplify handling these lists there are four possible actions to manipulate variant lists. First click the list you wish to edit. Then, you can see four icon-buttons on the top which are explained as follows:
- : duplicate the list
- : intersect this list with another list
- : subtract another list from this list
- : combine this list with another list
Publish variants
A superuser can upload or publish variants and their annotations or classifications to external databases. Currently, HerediVar offers to upload to ClinVar and HerediCaRe. To publish one or multiple variants the user has to navigate to one of the following pages:
- The variant details page: for single variant uploads
- The user variant lists page: uploads all variants in that user defined variant list
- The admin dashboard: automatically select all variants which got an update to their consensus classification since the last upload
There is an automatic upload algorithm running in the background which will regularily (at least once a month) check for updated consensus classifications and upload them to HerediCaRe.
Caveat:
It is possible to submit the same data multiple times. Though, HerediVar will skip the upload request and show a red triangle within the respective status pill on the variant details page. Consider this case: A user made a fresh consensus classification and submitted that to HerediCaRe. Right after he notices that the consensus classification needs adjustments. So he creates another consensus classification and submits that as well. In this case the updated consensus classification WILL NOT BE SUBMITTED, but skipped and the red triangle will show up.
This however will be resolved once a user resubmits the consensus classification after the previous one is finished or once the automatic upload algorithm catches the updated consensus classification. So whenever this happens consensus classifications take more time to fully update in the third party database.
Structural variants
Structural variants can only be inserted using the create structural variants page. They generally behave identical to a small variant, but are not annotated by the annotation service. Also, the interpretation of the information in the browse variants table differs slightly:

- If a deletion is longer than 1000 bp, the POS column contains the start and end position of the structural variant separated by a dash (-). The sequence of duplications and inversions is never displayed, independent of the length of the variant.
- The POS column will show a red triangle if the position is imprecise
- The HGVS c. and p. columns contain the hgvs strings that were provided by the user upon creation of the variant. They are not ordered in any way nor are they curated or correspond to the genes shown in the gene column
- The GENE column shows only genes that overlap the breakpoints of the structural variants
- blue: gene overlaps breakpoint
- bold: VUS-Task-Force important gene
- black: non breakpoint overlapping gene
Download data
Data can be downloaded as VCF files from this webapp or programmatically using the HerediVar application programming interface (API). Section API reference provides more information on how to use it.
All VCF files from HerediVar are encoded using the url encoding (Wikipedia). Excluding whitespace, which is replaced with underscores "_". This ensures that the
file is machine readable and consistent when special characters that are also used as delimiters are used within the actual information. It is fast forward to revert the encoding once relevant information was read from the file.
Many programming languages support url decoding out of the box.
In rare cases ClinVar submissions are missing although there is a ClinVar summary available. In such cases the clinvar_submissions info in the downloaded vcf file will be set to None. This is usually because of erroneous data hosted
by ClinVar and is often fixed by updating ClinVar.
The INFO column of VCF files generated by HerediVar adhere to this delimiter order:
- ;
- &
- |
- $
- +
Anonymous users
Anonymous users can download all classified variants and all classified structural variants in a VCF file here (using the download button on the left side). They will only see the consensus classifications by the VUS-task-force along with some meta information like the selected ACMG criteria and a comment. Most of this data is also publically available through ClinVar.
Download single variant
Registered users are able to download a VCF file for one variant through the respective variant details page by clicking the gear button and selecting "Export to VCF". This file will contain all information that are available
for this variant. Including all annotations and classifications.
Download specific sets of variants
Registered users can download a specific set of variants by collecting variants in a user defined list (see section user variant lists for more information). Then, simply click the gear button at the top of the page and select "Export list to VCF".
Download complete database
The complete database can be downloaded in VCF format here (using the download button on the right side). This file is a versioned download of all variants along with their annotations and classifications. A new HerediVar version is generated automatically every month. Previous versions can be accessed here.
API reference
In order to use the HerediVar API it is first required to get an API-key. A logged in user can request an API-key by navigating to the profile page. If
you do not have a login please reach out to us so we can discuss options. On the profile page click the (re-) generate button to generate a new API-key. The key is only shown once so
save it somewhere locally. Do not share your API-key with anyone.
Once you created your API-key you can use it in one of the specified endpoints.
Check variant
Download consensus classification
| Endpoint | /api/v1.0/get/consensus_classification |
| Description | Retieve the VUS task-force consensus classification from HerediVar for a specific HerediVar variant_id or a vcf-style variant defined on the grch38 reference genome |
| Allowed methods | GET |
| Headers | Required "Authorization:" header with apikey and username attributes |
| Data | Either the variant_id or chrom, pos, ref, and alt |
| Response & http status codes |
|
| Examples |
Using the variant id:
wget --header "Authorization: apikey $yourkey username $yourusername" /api/v1.0/get/consensus_classification?variant_id=15
Using chromosomal coordinates with respect to the GRCh38 reference genome
wget --header "Authorization: apikey $yourkey username $yourusername" /api/v1.0/get/consensus_classification?chrom=&pos=214730440&ref=G&alt=A
Example output:
{
"classification": {
"class_by_scheme": "4",
"classification_type": "consensus classification",
"comment": "overall comment",
"criteria": [
{
"evidence": "comment for ps2",
"id": 100,
"name": "PS2",
"state": "selected",
"strength": "strong pathogenic",
"strength_display_name": "str",
"type": "ps"
},
{
"evidence": "comment for pm3",
"id": 101,
"name": "PM3",
"state": "selected",
"strength": "medium pathogenic",
"strength_display_name": "mod",
"type": "pm"
}
],
"date": "2023-11-02 16:34:40",
"literature": null,
"scheme": {
"name": "ACMG standard",
"reference": "https://pubmed.ncbi.nlm.nih.gov/25741868/"
},
"selected_class": "4"
},
"variant": {
"alt": "A",
"chrom": "chr2",
"hidden": false,
"id": "15",
"pos": 214730440,
"ref": "G",
"variant_type": "small"
}
}
|
Upload variants
| Endpoint | /api/v1.0/post/variant |
| Description | Upload a variant in VCF or HGVSc. notation |
| Allowed methods | POST |
| Headers | Required "Authorization:" header with apikey and username attributes. |
| GET-data | type: The type of data that is going to be used. Must be one of {"vcf", "hgvs"} |
| POST-data |
One of the following sets is required:
|
| Response & http status codes |
|
| Examples |
Using the variant id:
wget --header "Authorization: apikey $apikey username $username" --post-data="chr=chr19&pos=50398920&ref=G&alt=C&genome=GRCh38" "/api/v1.0/post/variant?type=vcf"
Using chromosomal coordinates with respect to the GRCh38 reference genome
wget --header "Authorization: apikey $yourkey username $yourusername" /api/v1.0/get/consensus_classification?chrom=&pos=214730440&ref=G&alt=A
Example output variant already in database:
{
"flash_class": "alert-danger flash_id:variant_already_in_database",
"flash_link": "/display/1234",
"flash_message": "Variant not imported: chr19-50398920-G-C already in database!",
"status": "skipped"
}
Example output erroneous variant:
{
"flash_class": "alert-danger flash_id:variant_from_vcf_error",
"flash_link": "",
"flash_message": "VcfCheck runtime ERROR: VcfCheck 2024_02-84-g1b249e47\nVCF check failed - see 'out' file for details! Code: 1 ERROR: Reference base(s) not correct. Is 'A', should be 'G'! - in line 6:\nchr19\t5039892\t.\tA\tC\t.\t.\t.",
"status": "error"
}
Example output success
{
"flash_class": "alert-success flash_id:successful_variant_from_vcf",
"flash_link": "/display/1234",
"flash_message": "Successfully inserted variant: chr19-5039892-G-C",
"status": "success"
}
|
User management
Create a new user
Only users with the "account_manager" role are allowed to create new users. There is no possibility to self-register in HerediVar.
An account manager can go here to create a new user account. Simply fill out the form which is presented
to you. Keep in mind that the username must be unique and can not be changed later. The mail address must be unique as well.
Upon submission Heredivar will automatically notify the user that about the newly created account using the provided e-mail. The new user will
recieve two mails: one with the username specified and one with an automatically generated initial password.
Change roles & disable users
An account manager can edit existing users by visiting /show_users. Simply select a user from the list
to edit its information. It is possible to disable users or change their roles from this page.
Keep in mind that changeing the e-mail will require the user to verify the mail upon next login.
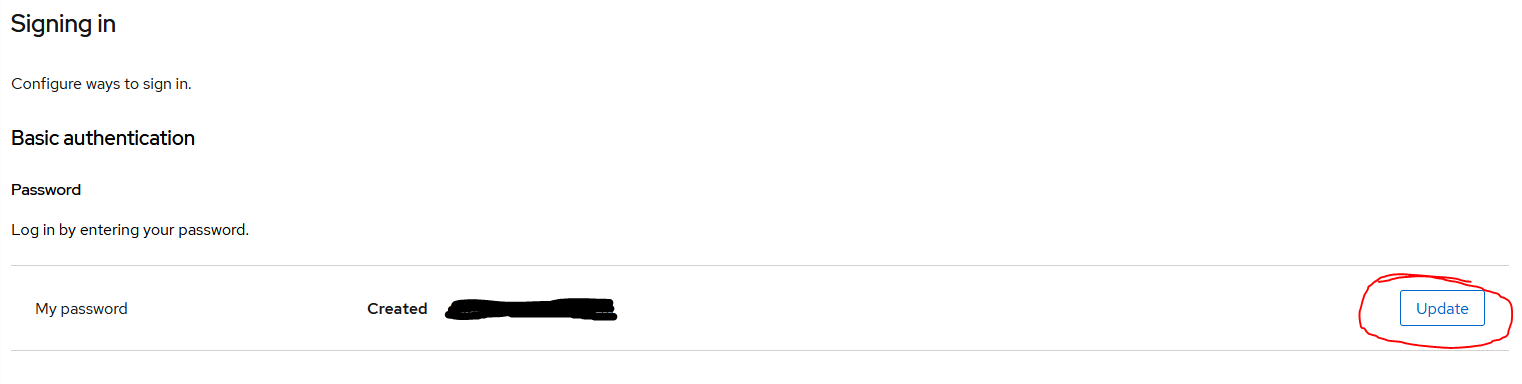
Change password
Every user can change their own password by visiting this page. This will redirect to the keycloak account management console. First click the Update-button: